Because later in this article we will build Conway's game of life mini project, therefore with deep regret we want to let our readers know that John Conway - a true legend, brilliant Princeton mathematician has recently passed away due to COVID-19. We strongly encourage you to familiarize yourself with his life and legacy, possibly by looking at this excellent editorial at quantamagazine.
Welcome to the next part of our Rust programming mini-series. Those of you who haven’t yet seen previous parts we encourage you to spare some time and take look at it:
With this part we skim through basic Rust concepts like traits, and generics. These topics are complex enough to require some shift in thinking paradigms from programmer accustomed to OOP like C++/Java in order to be used with ease.
We will also propose micro project to test in action what we have learned so far.
Let’s start.
Did you know?
Option data accessing with pattern matching, combinators, let Some(x) notation in everyday programmer work requires some effort and therefore may dampen your enthusiasm. And this is why Rust introduced operator ? which simplifies work with options in yet another way.
Consider following example:
struct Address {
    street: String,
}

struct Company {
    address: Option<Address>,
}

struct Person {
    workplace: Option<Company>,
}

fn workplace_street(p: Person) -> Option<String> {
    Some(p.workplace?.address?.street)
}

fn main() {
    let person = Person {
        workplace: Some(Company {
            address: Some(Address {
                street: "Sunset Boulevard".to_string(),
            }),
        }),
    };
    if let Some(street) = workplace_street(person) {
        println!("The company is located at: {}", street);
    }
}
Here we are interested in street component of person’s company address, but difficulty lays in that the company is optional as well as address for a company. Instead of using nested matches to unwrap street from address we can use ? operator. It evaluates to option contents or immediately return from enclosing function with None.
Therefore ? can only be used in functions that returns options (Option<T> for some T, as well as Result<T,E> - what we’ll see later) and can be used to evaluate arbitrarily deep option hierarchies. In our example expression: p.workplace?.address?.street will return None from function company_as_str if there is no workplace company or if company has no address.
Traits
Trait is a collection of methods which together define reusable behaviour. They are similar to interfaces known from other programming languages. Traits can be named and implemented for any data type.
//trait definition
trait Empty o
    fn is_empty(&self) -> bool;
}

struct Foo {text: String};

//trait implementation for given data type
impl Empty for Foo {
    fn is_empty(&self) -> bool{
        self.text.is_empty()
    }
}
Note 1: traits can be implemented for any type including existing built-in types or provided by any module you use which means you can apply completely new custom behaviours to existing libraries.
But there is one restriction. We can implement traits on type only if either trait or the type is local to our crate (packages in Rust are called crates). Which means that for instance we can implement standard Display trait on our type Foo (type Foo is local), also we can implement Empty trait on let’s say String (trait is local). But we can’t implement Display on String because both of those are not local to our crate.
Note 2: Traits may provide default definitions that may be overridden in impl block for given type.
impl Empty {
    fn is_empty(&self) -> bool{
        false
    }
}
Note 3: trait method for a given type can be use only if trait definition is in scope therefore, we can extend existing data type behaviour just by including source where trait is implemented.
Traits can have associated types which will be used in implementation. Let’s look at definition of Iterator trait:
trait Iterator {
  type Item;
  fn next(&mut self) -> Option<Self::Item>;
}
In this example Item is an associated Trait type and is used to denote a type of object which will be returned as an iterator result (wrapped in Option). In trait implementation for a given data type associated trait type will be defined.
struct Fibonacci (u32,u32);

impl Iterator for Fibonacci {
	type Item = u32; //associated Iterator type defined as u32

	fn next(&mut self) -> Option<u32> {
		let new_next = self.0 + self.1;
		self.0 = self.1;
		self.1 = new_next;
		Some(self.0)
	}
}

fn main(){
    let seq = Fibonacci(0,1);
    for i in seq.take(10) {
        print!("{}, ", i);
    }
}
Running code above will result in ten first Fibonacci numbers 1, 1, 2, 3, 5, 8, 13, 21, 34, 55.
Note 4: associated type cannot be defined in trait definition. You have to implement trait on a type to be able to define associated type. In trait declaration associated types are accessed by Self:: prefix which means the type we are implementing trait on.
Note 5: Iterator trait used in above example is standard iterator trait in Rust, and therefore upon implementing it you will gain various Iterator method “for free”. One of such a method is take(self, n: usize) which limits the number of items generated by the original iterator. Rust encourages you to write your own iterators wherever you feel like.
With traits you can also associate constants. Unlike associated types, constants may have assigned values in trait declaration as well as be redefined later in implementation on data type.
Consider slight modification of latest example:
struct Fibonacci (u32,u32);

trait Limit {
    const LIMIT: u32 = 3;
}

impl Limit for Fibonacci {}

impl Iterator for Fibonacci {
	type Item = u32;

	fn next(&mut self) -> Option<u32> {
		let new_next = self.0 + self.1;
		self.0 = self.1;
		self.1 = new_next;
		if new_next > Self::LIMIT {
		    None
		} else {
		    Some(self.0)
		}
	}
}
Now we will get only numbers less than LIMIT: 1, 1, 2. If our Limit trait had a wider use, we could redefine LIMIT constant in Fibonacci implementation:
impl Limit for Fibonacci {const LIMIT: u32 = 10;}
Now we will get: 1, 1, 2, 3, 5.
Note 6: Because you can always implement your own traits on types possibly provided by external crates there is risk of name collision for example lets define another function next with the same signature. Now we have symbol collision, but Rust provides syntax that can disambiguate traits we want to use:
trait Next {
    fn next(&mut self) -> Option<u32>;
}

impl Next for Fibonacci {
    fn next(&mut self) -> Option<u32> {Some(0)}
}

fn main(){
    let mut seq = Fibonacci(0,1);

    //syntax variant for disambiguation
    print!("{}, ", Next::next(&mut seq).unwrap());

    //another syntax variant for disambiguation
    print!("{}, ", <Fibonacci as Next>::next(&mut seq).unwrap());
}
Both disambiguation schemes form method names are known as universal function call syntax (in short UFCS). UFCS is not mandatory and because of that function name collisions can occur, especially when someone tries to add new features to third party libraries. In such a cases implementation of new trait on existing data structure may end up with conflicting methods. Such a try will fail with one of ‘multiple applicable methods in scope’ errors.
Another issue here is multiple implementation of the same trait but with different behaviour. For instance, it may be handy to have a couple of different iterators on the same data structure. As a practical example you can consider iterators for different types of graph traversals. One of possible solutions in such a case is to implement proxy data structures - separate for each use context - with its own Iterator trait implementations.
Generics
Traits as we discussed before are a way to generalize behaviours over data structures allowing us to define contracts (interfaces) type has to meet. Traits are thus declarative tool which allows us to clarify abstractions.
But what with the hard work? After all, hard programming work of implementation must be done. What, when we have visibly the same implementations for different types? Take a look at simple example:
fn swap_i(a: i32, b: i32) -> (i32, i32) {
    (b, a)
}
What if we have also need to use swap for f64 type:
fn swap_f(a: f64, b: f64) -> (f64, f64) {
    (b, a)
}
Notice that, function body is the same, although functions operate on different data types. Generics are precisely answer to that kind of a problem. We can abstract types on which we will do the same workflow. To do that we have to use placeholder notation <T>, which means we will use any type T.
fn swap<T>(a: T, b: T) -> (T, T) {
    (b, a)
}

fn main() {
    println!("{:?}", swap(5.0f64, 7.5f64));
    println!("{:?}", swap("One", "Two"));
}
Now we can use our swap function not only for numeric types, but exactly for all of them.
Note1: Generics are instantiated at a compile time for all required type combinations. In above example our code would get swap version for f64 type, as well as for T=&str.
Note2: Generics can be use also to define structures and generic traits. Remember Option<T> discussed before? Similar widely used type is Result
enum Result<T, E> {
    Ok(T),
    Err(E),
}
As a generic trait example, we can take Add trait from standard library. This trait provides addition operator + for data types:
pub trait Add<T = Self> {
    type Output;
    fn add(self, rhs: T) -> Self::Output;
}
Note3: In generic Add trait default trait argument was provided - which is Self (a super trait meaning type of entity trait is implemented on).
We can implement Add for our custom types, and moreover, types of add (i.e. + operator) arguments may differ (we can redefine default Self value).
#[derive(Clone)]
struct Employee {
    name: String,
}

impl Employee {
    fn new(name: String) -> Self {
        Employee { name }
    }
}

struct Company {
    employes: Vec<Employee>,
}

impl Company {
    fn new() -> Self {
        Company {
            employes: vec![Employee {
                //we add founder member
                name: "CEO".to_string(),
            }],
        }
    }
}

impl Add<Employee> for Company {
    type Output = Self;
    fn add(self, other: Employee) -> Self {
        let mut c = Company::new();
        c.employes = self.employes.to_vec();
        c.employes.push(other);
        c
    }
}

fn main() {
    let c = Company::new();
    let e = Employee::new("Super Hero Programmer".to_string());

    //this is most important part:
    //   we are combining Company and Employee,
    //   which gives us new Company

    let c1 = c + e;

    for e in c1.employes {
        print!("{:?}", e.name);
    }
}
Output of this little program is "CEO","Super Hero Programmer".
Generics are a powerful tool designed in order to give not only flexibility but also compile time guaranties that code will behave properly. For a full-fledged Rust programmer above samples are extremely simple as well as seemingly selected in a way that allows us to forget about generic traits contracts that have to be assured.
Those contracts lead among others to some new language aspects like:
- generic bounds and lifetimes,
- static and dynamic dispatch,
- consideration on polymorphism and composition over inheritance paradigm Rust promotes.
Generic bounds, we will discuss in next part of this series. For now, let’s take a break and have some fun.
Programming Interlude: Cellular Automata
We will start with Conway’s game of life known probably from introductory computer science lectures. Its name is a little misleading because it is not a game at all, but rather a dynamical system which evolves according to a couple simple rules. It is set up on a regular grid of cells in two dimensions. Each cell caries single information telling us if cell is empty or alive.
Evolution of a system is an iterative process, and on each step, cells became alive or empty what depends only on previous state of nearest neighbours.
- Any alive cell with two or three neighbours will still be alive,
- Any empty cell with three alive neighbours becomes alive,
- All other alive cells are emptied in the next generation.
- All other empty cells are unchanged.
Armed with all this knowledge we can start to implement game of life in Rust.
Project setup
To start a new project, we use cargo package manager which will deal with all dependencies and directory structure.
$ cargo new game_of_life
It needs to say that Rust and more precisely cargo have opinion on project structure and sets it up in its own way. It will become even more striking later when we will need library modules.
In order to run stub program generated by cargo we can write on terminal:
$ cargo run
  Compiling game_of_life_01 v0.1.0 (game_of_life_01)
  Finished dev [unoptimized + debuginfo] target(s) in 5.69s
  Running `game_of_life_01`
Hello, world!
Note1: we can also do extensive hint/lint of our program using cargo clippy or reformat code in place according to Rust style guides with help of cargo fmt.
Note2: This project is available on GitHub and we strongly encourage you to have a look at code while following next paragraphs.
GitHub version is also a bit more advanced - for instance it was split into separate modules as well as uses clap crate to handle runtime parameters.
Therefore, running it requires following command:
$cargo run -- -g 50 -s 2000 -t 0.3
Cargo allows you to add runtime program options after –. Clap produces also usage information in standard command line way:
$cargo run -- --help

Game of life

USAGE:
    game_of_life --grid-size <GRID SIZE> --steps <STEPS NUMBER> --threshold <THRESHOLD>

FLAGS:
    -h, --help       Prints help information
    -V, --version    Prints version information

OPTIONS:
    -g, --grid-size <GRID SIZE>    Size of rectangular grid on which Conway's game of life unfolds
    -s, --steps <STEPS NUMBER>     Number of simulation steps
    -t, --threshold <THRESHOLD>    Random initialization threshold
Grid structure
Game of life needs fairly easy abstractions to implement. There are two entities we are interested in:
- cell which is required to store single byte of information – is cell alive or empty.
- two-dimensional grid of cells which can be iterated and provides tools to enumerate cell neighbours.
For a pet project where we do not push optimization to the boundaries, aren’t interested in scrupulous memory efficiency or CPU cashes/GPU throughput, we have a freedom to choose clear abstractions over performance, therefore instead of counting single bits we will represent cells with enum:
pub enum Cell {
    Empty = 0,
    Alive = 1,
}
and for grid we chose simple Vec<Cell>. Despite the fact we need two-dimensional structure in our case its fairly easy to navigate on 1D vector. What we gain this way is simplicity in element enumerations without any additional effort. Our grid will be represented by:
pub struct Grid {
    pub size: usize,
    pub grid: Vec<Cell>,
}
Where size is 2D rectangular grid linear dimension (i.e. grid will have size*size cells). Having setup done, we can start to think of actual simulation.
Kernel functions
Simulation rules outlined before need to be evaluated on every cell in our grid. Moreover, computation does not depend only on this very cell but need to use its neighbourhood. In our case neighbourhood is defined as 3x3 matrix of nearest points. You can represent it as a sliding mask matrix of form:
applied on each point on our grid in such a way that our given point is in canter of matrix. Coefficients here mean that we are interested in points which have value 1 in this matrix.
How to exactly apply this sliding kernel matrix to our linear setup? The easiest way is to define addresses shifts which can point to all neighbouring cells given central cell index in our grid vector. Note that shifts depend on grid size:
 ns_directions: [
    -size – 1, -size, -size + 1,
    -1,0,1,
    size – 1, size, size + 1,
],
Adding above shifts to index of any cell in grid will result in indexes of all its neighbours. Implementation require a few details more:
fn count_ns(&self, ndx: usize) -> i32 {
    let size_i: i32 = self.size as i32;
    let ndx_i : i32 = ndx as i32;

    self.ns_directions
        .iter()
        .map(|offset| offset + ndx)
        .filter(|&x| {
            let is_in_bounds = x > 0 && x < size_i * size_i;
            let is_not_in_center = x != ndx_i;
            let is_not_wrapped = ( x % size_i - ndx_i % size_i ).abs() <= 1;

            is_in_bounds && is_not_in_center && is_not_wrapped
        })
        .map(|n| self.grid[n as usize] as i32)
        .sum()
}
As you can see, we have to filter out some boundary cases:
- all indexes that are out of storage boundaries
- indexes that are not real neighbours – our linear data structure wraps itself and therefore points with close indexes can land on the other side of our grid.
- as well as centre point itself.
Having filtered out all unwanted phantom neighbours brought into being mainly by our choice of data structure we have to map all Cell values int integer values 0 for empty cell or 1 for alive and sum all together.
Now we can apply Conway’s rules and implement simulation update function:
pub fn update(&mut self) {
        let mut new_grid: Grid = Grid::new(self.size);
        new_grid.grid.iter_mut().enumerate().for_each(|(ndx, c)| {
            let ns_count: i32 = self.count_ns(ndx);
            let cell = self.grid[ndx] as i32;

            *c = match ns_count {
                2 | 3 if cell > 0 => Cell::Alive,
                3 if cell == 0 => Cell::Alive,
                _ => Cell::Empty,
            };
        });

        self.grid = new_grid.grid;
    }
Update is done in simple way just by introducing new grid structure and evaluating Conway’s rules on previous generation of grid values. It is of course possible to modify grid in place with some additional effort, but it would needlessly complicate our code base. Rules of the game are encoded in match statement.
Note1: You may have noticed that iterator used on grid: grid.iter_mut() is a special kind of iterator that allows to mutate elements of collection. It allows us basically to do *c = … a few of lines further.
Note2: See also usage of enumerate adaptor which returns new iterator - elements of which are tuples consisting of current count, and enumerated value. This way we wrote down, in a little fancy functional fashion, an ordinary for loop with index. But now comes what’s really interesting.
Note3: Iterator iter_mut applied to grid is single threaded. Only by changing it to par_iter_mut from rayon crate we can be blessed with multithreaded iteration. par_iter_mut partitions our grid into disjunct chunks splitting it by split_at_mut:
let (part1, part2) = grid.split_at_mut(index);
And then, parts of grid are processed concurrently by a thread pool. Thanks to ownership/borrowing system with mutability restrictions rust generally gives you unique ease in turning single threaded code into its concurrent version.
In order to get some non-trivial results, we have now to initialize grid with some values. We will choose random initialization:
fn init_random(&mut self, threshold: f64) {
    let mut rng = rand::thread_rng();
    for ndx in 0..self.size * self.size {
        let v: f64 = rng.gen();
        if v < threshold {
            self.grid[ndx] = Cell::Alive;
        }
    }
}
Random number generator rng is taken from rand crate and with rng.gen() we can generate numbers in range 0.0f64 to 1.0f64.
Now we can use our simulation like this:
fn main() {
    const GRID_SIZE: usize = 100;
    const UPDATE_COUNT: usize = 100;

    let mut g = Grid::new(GRID_SIZE);
    for no in 0..UPDATE_COUNT {
        g.update();
    }
}
Finishing touches
Our simple simulation is ready, but so far, we lack any visualisation method to share our computation results. To fix this we will write down each step as an image. This task is not very demanding so we use simple canvas on which we will draw some lines and boxes.
Excellent solution providing canvas drawing is raqote crate used in various Rust projects. We start with new drawing target which represents our canvas:
let mut dt = DrawTarget::new(image_size , image_size);
And then draw our grid:
let size: f32 = grid_count as f32 * (grid_box_size + grid_line_width);
let mut pb = PathBuilder::new();
for n in 0..(grid_count + 1) {
    let n_box = (n as f32) * grid_box_size;
    pb.move_to(0., n_box);
    pb.line_to(size, n_box);
    pb.move_to(n_box, 0.);
    pb.line_to(n_box, size);
}
pb.close();
let path = pb.finish();

dt.stroke(&path, &src, &StrokeStyle::default(), &DrawOptions::new());
Our cells will be drawn as simple rectangles:
for ndx in 0..grid_size * grid_size {
    let (x, y) = (ndx % grid_size, ndx / grid_size);

    let xx = (x as f32) * (grid_box_size as f32);
    let yy = (y as f32) * (grid_box_size as f32);

    if let Cell::Alive = self.grid[ndx] {
        let mut pb = PathBuilder::new();
        pb.rect(xx, yy, grid_box_size, grid_box_size);
        dt.fill(&pb.finish(),
                  &Source::Solid({r:0x00, g:0x00, b:0xff, a:0xff}),
                 &DrawOptions::new());
    }
}
dt.write_png(file_name)?;
Because we are interested only in one cell value that is Cell::Alive we can use simple matching with if let instead of match this time.
When everything is ready, we can write image content to a file.
All above drawing code is encapsulated in save method added to Grid structure:
pub fn save(&self, file_name: &str, cfg: &ImageExportConfig) -> Result<(), std::io::Error>
As you can see function returns Result enum (we mentioned earlier) that may be either Ok or Error (error handling will be discussed in detail later in this series). Now in our main simulation function we can save each step to an image:
let mut g = Grid::new(grid_size, threshold);

for no in 0..steps {
    g.save(
        &format!("output/game_of_life_{:05}.png", no),
        &ImageExportConfig::default(),
    )
    .expect("Error while save file!");
    g.update();
}
From all of those images we can produce for instance animated gif file using another very handy Rust tool: gifski.
In order to do this, we have to install tool with cargo install gifski and then use it like this:
gifski -o game_of_life.gif output/game_of_life_*.png
Result can look like this:
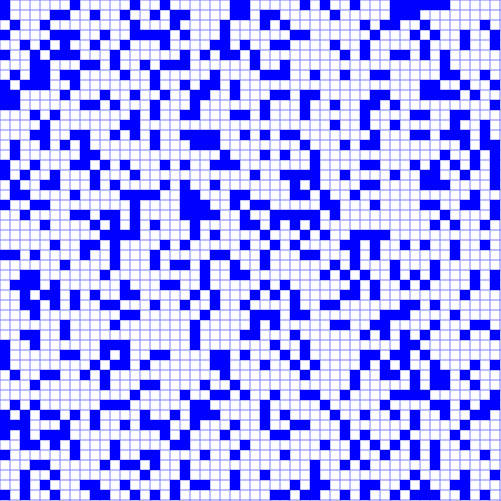 Game of Life result
You can see the source code at GitHub.
That’s all for this part. Stay tuned, next article coming soon!